Photography is an exciting way for nature lovers to capture the beauty of wildlife. Trail cameras are useful tools in the age of technology. They allow us to observe shy creatures without being noticed.
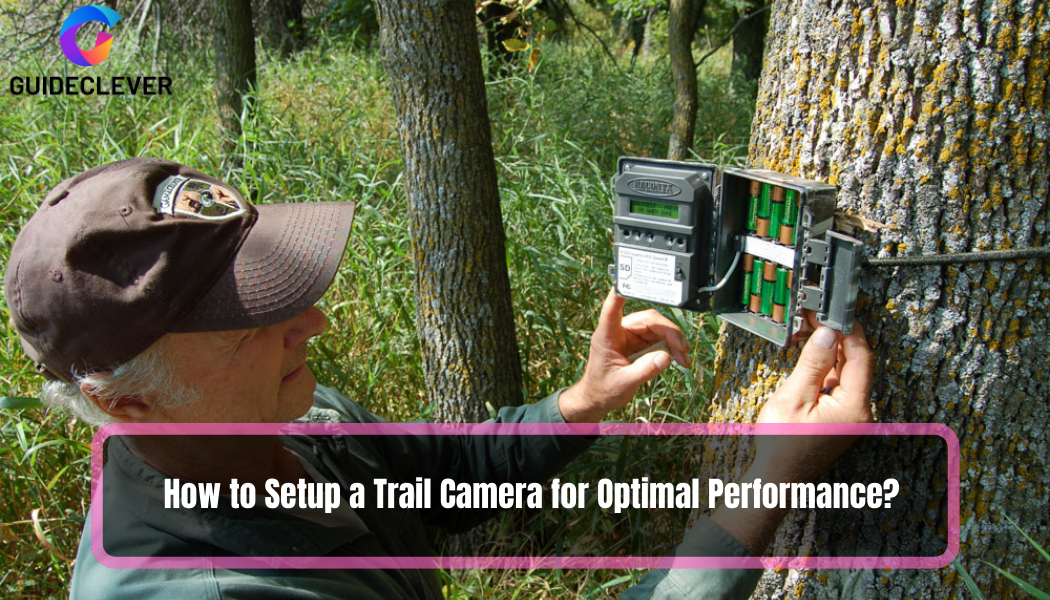
Setting up a trail camera for best results is more than just hanging it on a tree. To capture wild moments using your trail camera, you need to know. where to put it, how to set it up, how to power it, and how to analyze the data.
In this guide, we will delve into the intricacies of “How to Setup a Trail Camera for Optimal Performance.” Read on to learn how to make the most of your trail camera and discover nature’s wonders.
Contents
Choosing the Right Location to Setup Your Trail Camera
Selecting the right location for your trail camera is paramount. It’s the difference between capturing incredible wildlife moments and getting blank frames.
- Wildlife Patterns and Behavior: Study the animals in your area. Where do they forage or travel? To increase your chances of catching animals on camera, put your camera along these paths.
- Security and Accessibility: Ensure your camera is secure from theft or vandalism. Choose spots that are less likely to be disturbed by humans.
- Natural Light and Shadows: Avoid direct sunlight, as it can wash out photos. Adjust your camera to capture the best light and be mindful of shadows in your photos.
Trail Camera Placement
Now that you’ve chosen the right location, it’s time to position your camera correctly. Where you put your trail camera affects how good your wildlife footage is. Here are some key considerations:
1. Proper Positioning:
Once you’ve found the right location, it’s essential to position the camera correctly. Ensure that it’s level and stable. If possible, use a strong mount and prevent the camera from moving in the wind or by animals.
2. Recommended Heights and Angles:
The height at which you place your camera depends on the size of the target animals. Here are some general guidelines:
- Chest Height: For larger animals like deer and bears. position the camera at chest height to capture their full profile.
- Lower Height: For smaller animals like raccoons or rabbits. place the camera lower to the ground. Capture your shots at eye level to make them more engaging and detailed.
3. Angle Adjustment:
Angle your camera slightly downward. This device captures animals at the same height as your eyes. It also stops light reflections that might block your photos.
4. Concealing the Camera:
Wildlife can be surprisingly observant, and a visible camera might make them wary. Camouflage the camera with natural materials like branches, leaves, or moss. Be sure not to obstruct the lens or sensors, though. When securing the camera cover, be careful not to damage nearby objects with straps or cords.
Trail Camera Setup
To get the best results, it’s important to understand and set up your trail camera correctly. Let’s explore this further:
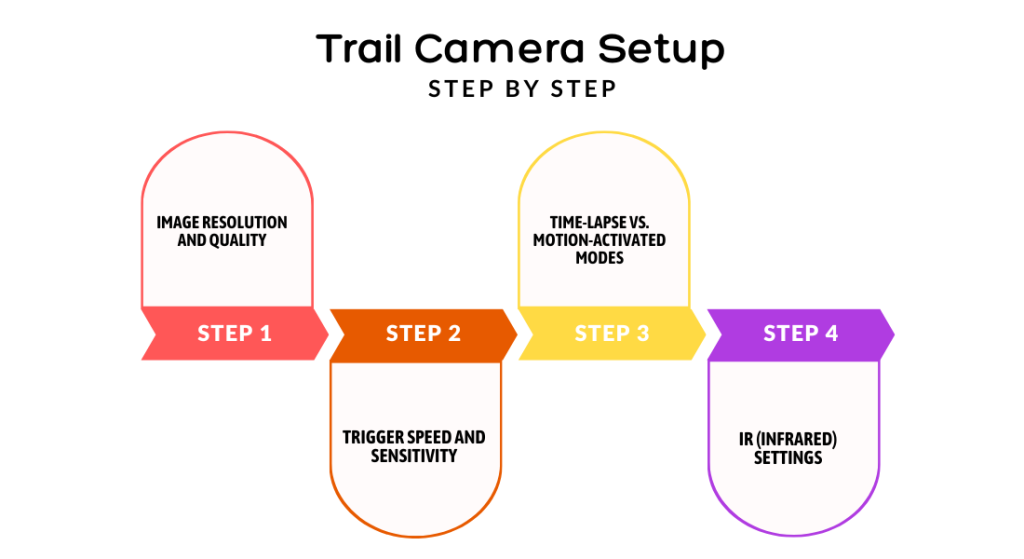
1. Image Resolution and Quality:
Trail cameras offer various image resolution options. Higher resolution produces clearer images but consumes more storage space. Choose a resolution that balances image quality with available storage capacity. If you have ample storage, opt for higher resolution settings.
2. Trigger Speed and Sensitivity:
These settings determine how quickly the camera responds to motion. Adjust the trigger speed according to the speed of the animals in your area. For fast-moving animals, use a faster trigger speed. Sensitivity settings control what triggers the camera. Lowering sensitivity reduces false alarms caused by plants moving. While increasing sensitivity detects small movements. Fine-tune these settings based on the environment and wildlife behavior.
3. Time-lapse vs. Motion-Activated Modes:
Depending on your purpose, choose the appropriate camera mode. A time-lapse takes pictures regularly to show what happens in the area over time. Motion-activated mode saves power by capturing images only when it detects movement. If you want to see all the wildlife patterns, use time-lapse. If you want to focus on certain events, use motion-activated mode.
4. IR (Infrared) Settings:
Infrared settings are crucial for night vision. Most trail cameras now use infrared lights to light up the area without scaring animals. Configure IR settings to match the ambient light conditions. To check if your camera takes good pictures at night, test its night vision.
To get the best results from your trail camera, pay attention to where you place it and how you set it up. This way, you can capture amazing wildlife moments without disturbing the natural environment.
Trail Camera Power Management
Battery life is a critical factor in maximizing the usefulness of your trail camera. Here’s how to manage trail camera power effectively:
1. Choosing the Right Batteries:
The batteries you use can affect how long they last, especially in extreme conditions. Lithium batteries last longer and work better in both hot and cold conditions. Before using the camera, make sure to read the manual to see which batteries it needs. Some cameras need specific brands or sizes.
2. External Power Options:
If you want your trail camera to last longer and not change batteries frequently. Try using solar panels or external battery packs. During the day, solar panels recharge the camera’s batteries, giving it constant power. You can connect external battery packs to the camera to keep it working for a long time.
Trail Camera Testing and Fine-Tuning
Before you go, test and adjust your trail camera to ensure it works properly. This will help you take the best pictures and avoid any problems.
1. Initial Testing:
- Image Capture: Set up the camera and take a series of test shots to ensure it captures images correctly. Verify that the field of view covers the intended area and that there are no obstructions in the shot.
- Trigger Speed and Sensitivity: Test the camera’s trigger speed and sensitivity settings by walking in front of it to simulate wildlife movement. Make sure it detects movement correctly, not from plants or other non-animal things.
- Time-lapse vs. Motion-Activated Mode: If you plan to use time-lapse mode. Verify that it captures images at the desired intervals.
2. Fine-Tuning:
- Review Initial Results: Examine the test images and videos you captured during the initial testing phase. Pay attention to image quality, exposure, and the behavior of the camera in response to motion.
- Adjust Settings: Based on your review, make any necessary adjustments to the camera’s settings. This might include fine-tuning the trigger speed, sensitivity, image resolution, or other parameters.
- Check for Obstructions: Regularly inspect the camera to ensure that branches, leaves. Or other objects haven’t moved into the camera’s field of view or blocked the lens or sensors. Clear any obstructions to maintain clear and unobstructed shots.
To improve your trail camera setup, test and adjust it carefully. This will make it work better, avoid problems, and get great pictures and videos of wildlife. Preparing will make using your trail camera more rewarding and successful in the end.
Trail Camera Data Retrieval and Analysis
After leaving your trail camera in the field for a period. It’s essential to retrieve and make sense of the data you’ve collected:
1. Retrieving Data:
- Memory Card: If your trail camera uses a memory card, retrieve it from the camera. Make sure to do this carefully to avoid damaging the card or the camera’s connectors.
- Remote Access: Some trail cameras offer remote access via a smartphone app and other methods. If your camera can do this, you can get pictures and videos without going there.
2. Organizing and Analyzing:
- Sort and Categorize: Organize the data by date, time, and location. Create folders or use software to sort images and videos efficiently.
- Pattern Recognition: Analyze the data for patterns in animal behavior. Look for specific times of day or night when wildlife is most active. Note any recurring visitors or unusual behavior. This analysis can provide valuable insights into the local ecosystem.
Trail Camera Troubleshooting
Trail cameras are reliable tools, but issues may occasionally arise. Here’s how to address common problems:
1. Common Issues:
- Blurry Images: Blurry images can result from camera movement during the capture process. Ensure the camera is securely mounted and stable. Also, verify that the lens is clean and free of condensation or debris.
- False Triggers: False triggers can be caused by wind-blown vegetation or small animals. Adjust the sensitivity settings to reduce false captures.
- Camera Malfunctions: If the camera stops working or displays errors. It’s consult your camera’s manual for troubleshooting steps. Common issues might include battery-related problems, memory card issues, or software glitches. Online resources and user forums may also provide solutions to specific problems.
2. Technical Problems:
- Contact Customer Support: If you encounter technical issues beyond your control. Or the scope of available troubleshooting steps. Don’t hesitate to contact the camera’s manufacturer’s customer support. They can provide guidance, repair services, or warranty assistance as needed.
To keep your trail camera working well, take care of it regularly and fix any problems quickly. To learn about animals in your area, keep track of their habits and behaviors. Understanding this information helps you appreciate nature and enjoy using trail cameras.
Conclusion
For the trail camera to work well, consider its location, setup, and power management. When done correctly, it can provide you with a wealth of information about the wildlife in your area. So, get out there, set up your camera, and unlock the mysteries of the natural world.
We’d love to hear about your experiences with trail cameras. Share your setup stories and tips in the comments section below. Remember to save our blog GuideClever.com. It has wildlife photography and outdoor tips. Happy trail camera adventures!
Additional Resources
For more tips and tools to enhance your trail camera setup, check out the following resources:
FAQ’s on How to Setup a Trail Camera
Q1. How do I choose the best location for my trail camera?
- Answer: Selecting the right location is crucial for optimal performance. Search for places where animals are active, like paths, water sources, or places they eat. Consider the angle of sunlight, security, and accessibility. To find the best spots, study how local animals behave and where they usually go.
Q2. What are the ideal camera settings for wildlife photography with a trail camera?
- Answer: Camera settings depend on your goals and the environment. To get clear images, use a high-resolution setting. Just remember to consider storage capacity. Adjust trigger speed and sensitivity based on animal movement in your area. Time-lapse mode takes continuous pictures. Motion-activated mode saves power by capturing only when there is movement. IR settings should match ambient light for optimal night vision.
Q3. How can I extend the battery life of my trail camera?
- Answer: To maximize battery life, consider using lithium batteries. As they perform well in extreme conditions. You can use solar panels or external battery packs for extra power. Also, make sure your camera isn’t recording all the time to save battery. Make sure to regularly check and remove anything that could cause false captures. Unnecessary activations can drain the battery.
1 thought on “How to Setup a Trail Camera for Optimal Performance?”